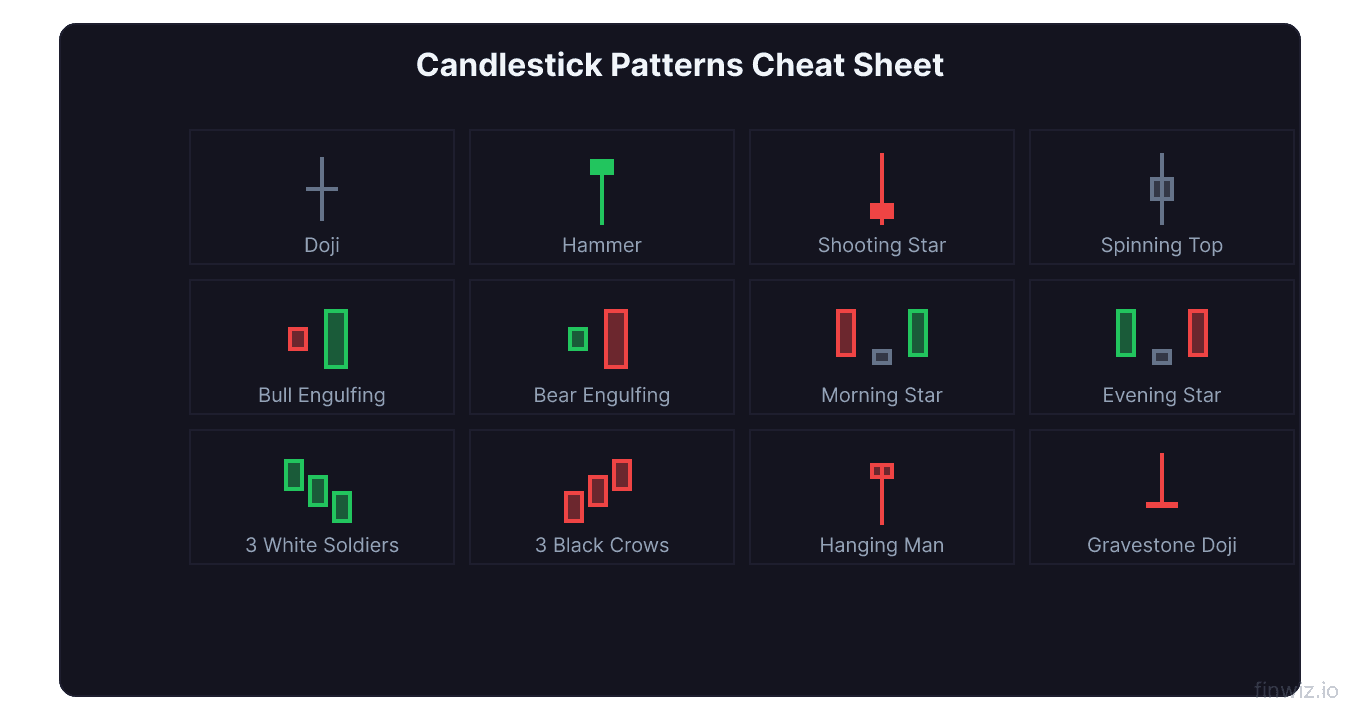
Candlestick Cheat Sheet: All 35 Patterns on One Page
⚡ Key Takeaways
- Candlestick patterns are visual representations of price action that signal potential reversals or continuations
- Patterns are grouped into bullish reversal, bearish reversal, and continuation/neutral categories
- Single-candle patterns (doji, hammer, shooting star) provide instant signals at key levels
- Multi-candle patterns (engulfing, morning star, three soldiers) are generally more reliable
The Complete Candlestick Pattern Cheat Sheet
Candlestick patterns are specific formations created by one or more price bars that signal potential future price movements. Originating in 18th-century Japanese rice trading, candlestick analysis has become one of the most widely used tools in modern technical analysis.
Each candlestick represents four data points: the open, high, low, and close for a given period. The filled or hollow body shows the range between open and close, while the wicks (shadows) show the high and low extremes. A green (or hollow) candle indicates the close was above the open; a red (or filled) candle indicates the close was below.
This cheat sheet covers all 35 essential candlestick patterns, organized by signal type and reliability. Use these patterns in combination with volume analysis, chart patterns, and support/resistance levels for the most reliable signals.
How to Read Candlesticks
Before diving into patterns, understand the anatomy:
| Component | Description |
|---|---|
| Body | The range between open and close |
| Upper wick/shadow | The range between the body top and the high |
| Lower wick/shadow | The range between the body bottom and the low |
| Bullish candle (green) | Close > Open |
| Bearish candle (red) | Close < Open |
| Marubozu | Full body with no wicks — maximum conviction |
| Doji | Open ≈ Close — body is a thin line |
Pro Tip
Bullish Reversal Patterns (Single Candle)
These patterns appear at the bottom of downtrends and signal a potential reversal upward.
Hammer
A small body at the top of the candle's range with a long lower shadow (at least 2x the body). The lower shadow shows that sellers pushed the price down significantly, but buyers recovered to close near the high. Color of the body does not matter, but a green body is slightly more bullish.
Inverted Hammer
A small body at the bottom of the range with a long upper shadow. Appears after a downtrend. The upper shadow shows buying interest emerging, though sellers pushed it back down by the close. Confirmation on the next candle is important.
Dragonfly Doji
A doji with a long lower shadow and no upper shadow. The open, close, and high are all at or near the same level. This is a strong bullish signal at support, showing complete rejection of lower prices.
Bullish Marubozu
A large green candle with no upper or lower shadows. This shows maximum buying conviction — buyers controlled the entire session from open to close.
Bearish Reversal Patterns (Single Candle)
These appear at the top of uptrends and signal a potential reversal downward.
Shooting Star
A small body at the bottom of the range with a long upper shadow. The upper shadow shows that buyers pushed prices higher but sellers drove them back down by the close. The mirror image of the hammer.
Hanging Man
Identical in shape to a hammer but appears at the top of an uptrend. The long lower shadow indicates that sellers briefly took control during the session. Confirmation with a bearish candle the following day strengthens the signal.
Gravestone Doji
A doji with a long upper shadow and no lower shadow. The open, close, and low are all at or near the same level. Shows complete rejection of higher prices at the top of a move.
Bearish Marubozu
A large red candle with no shadows. Maximum selling conviction — sellers controlled the entire session.
Bullish Reversal Patterns (Multi-Candle)
Bullish Engulfing
A two-candle pattern: a small red candle followed by a large green candle that completely engulfs the body of the prior candle. The greater the size difference, the stronger the signal.
Morning Star
A three-candle pattern: (1) a large red candle, (2) a small-bodied candle (any color) that gaps below the first, and (3) a large green candle that closes well into the body of the first candle. This is one of the most reliable bullish reversal patterns.
Morning Doji Star
Same as the morning star but the middle candle is a doji, emphasizing the moment of indecision before the bullish reversal.
Three White Soldiers
Three consecutive large green candles, each opening within the prior candle's body and closing higher. Each candle should have small or no upper shadows. Signals a strong shift from bearish to bullish sentiment.
Piercing Line
A two-candle pattern: a large red candle followed by a green candle that opens below the prior low but closes above the midpoint of the prior red candle's body. The deeper the penetration, the stronger the signal.
Bullish Harami
A large red candle followed by a small green candle whose body is entirely contained within the prior candle's body. Indicates selling pressure is fading. Requires confirmation.
Tweezer Bottom
Two candles with matching lows, where the first is bearish and the second is bullish. The equal lows suggest strong support at that price level.
Three Inside Up
A three-candle pattern that begins with a bullish harami (candles 1 and 2) followed by a third green candle that closes above the first candle's high. Confirms the harami signal.
Bearish Reversal Patterns (Multi-Candle)
Bearish Engulfing
A small green candle followed by a large red candle that completely engulfs the prior body. One of the most reliable bearish reversal signals, especially at resistance.
Evening Star
A three-candle pattern: (1) a large green candle, (2) a small-bodied candle that gaps above, and (3) a large red candle that closes well into the body of the first candle. The mirror of the morning star.
Evening Doji Star
Same as the evening star but with a doji as the middle candle. A very strong bearish reversal signal.
Three Black Crows
Three consecutive large red candles, each opening within the prior candle's body and closing lower. Signals a decisive shift from bullish to bearish sentiment.
Dark Cloud Cover
A large green candle followed by a red candle that opens above the prior high but closes below the midpoint of the prior green body. The bearish counterpart to the piercing line.
Bearish Harami
A large green candle followed by a small red candle contained entirely within the prior body. Signals buying momentum is stalling.
Tweezer Top
Two candles with matching highs, first bullish then bearish. Equal highs indicate strong resistance at that price.
Three Inside Down
Starts with a bearish harami then a third red candle closing below the first candle's low. Confirms the bearish harami.
Continuation and Neutral Patterns
Doji
The open and close are at or near the same price, creating a cross-like appearance. Represents indecision — neither buyers nor sellers gained an advantage. There are several doji variants:
| Doji Type | Shape | Meaning |
|---|---|---|
| Standard Doji | Cross (+) | Pure indecision |
| Long-Legged Doji | Large cross | High volatility indecision |
| Dragonfly Doji | T shape | Bullish (at support) |
| Gravestone Doji | Inverted T | Bearish (at resistance) |
| Four Price Doji | Dash (—) | Extremely low activity |
Spinning Top
A small body with upper and lower shadows that are longer than the body. Similar to a doji but with a visible body. Indicates indecision but less emphatically than a doji.
Rising Three Methods
A bullish continuation pattern: a large green candle, followed by 2-4 small red candles that stay within the first candle's range, followed by another large green candle that closes above the first. The small candles represent a brief rest before the uptrend continues.
Falling Three Methods
The bearish counterpart: a large red candle, 2-4 small green candles contained within its range, then another large red candle closing below the first.
Tasuki Gap (Up and Down)
An upward tasuki gap: two green candles with a gap between them, followed by a red candle that opens within the second candle's body and closes within the gap — but does not fill it completely. The unfilled gap indicates the uptrend is likely to continue.
The downward tasuki gap is the bearish mirror image.
Quick Reference Table: All 35 Patterns
| Pattern | Candles | Type | Signal | Reliability |
|---|---|---|---|---|
| Hammer | 1 | Reversal | Bullish | Moderate-High |
| Inverted Hammer | 1 | Reversal | Bullish | Moderate |
| Dragonfly Doji | 1 | Reversal | Bullish | Moderate |
| Bullish Marubozu | 1 | Reversal | Bullish | High |
| Shooting Star | 1 | Reversal | Bearish | Moderate-High |
| Hanging Man | 1 | Reversal | Bearish | Moderate |
| Gravestone Doji | 1 | Reversal | Bearish | Moderate |
| Bearish Marubozu | 1 | Reversal | Bearish | High |
| Bullish Engulfing | 2 | Reversal | Bullish | High |
| Bearish Engulfing | 2 | Reversal | Bearish | High |
| Piercing Line | 2 | Reversal | Bullish | Moderate |
| Dark Cloud Cover | 2 | Reversal | Bearish | Moderate |
| Bullish Harami | 2 | Reversal | Bullish | Low-Moderate |
| Bearish Harami | 2 | Reversal | Bearish | Low-Moderate |
| Tweezer Bottom | 2 | Reversal | Bullish | Moderate |
| Tweezer Top | 2 | Reversal | Bearish | Moderate |
| Morning Star | 3 | Reversal | Bullish | High |
| Evening Star | 3 | Reversal | Bearish | High |
| Morning Doji Star | 3 | Reversal | Bullish | High |
| Evening Doji Star | 3 | Reversal | Bearish | High |
| Three White Soldiers | 3 | Reversal | Bullish | High |
| Three Black Crows | 3 | Reversal | Bearish | High |
| Three Inside Up | 3 | Reversal | Bullish | Moderate-High |
| Three Inside Down | 3 | Reversal | Bearish | Moderate-High |
| Standard Doji | 1 | Neutral | Indecision | Context-dependent |
| Long-Legged Doji | 1 | Neutral | Indecision | Context-dependent |
| Spinning Top | 1 | Neutral | Indecision | Low |
| Four Price Doji | 1 | Neutral | Low activity | Low |
| Rising Three Methods | 5 | Continuation | Bullish | Moderate-High |
| Falling Three Methods | 5 | Continuation | Bearish | Moderate-High |
| Upward Tasuki Gap | 3 | Continuation | Bullish | Moderate |
| Downward Tasuki Gap | 3 | Continuation | Bearish | Moderate |
| Bullish Belt Hold | 1 | Reversal | Bullish | Moderate |
| Bearish Belt Hold | 1 | Reversal | Bearish | Moderate |
| Abandoned Baby | 3 | Reversal | Either | High |
Tips for Using Candlestick Patterns Effectively
Combine with other analysis. Candlestick patterns alone are not sufficient for trading decisions. Pair them with chart patterns, volume, support/resistance levels, and trend analysis.
Context is critical. A bullish engulfing at a key support level within a bull market is far more reliable than one appearing in the middle of a strong downtrend. Always consider the bigger picture.
Higher timeframes are more reliable. Daily and weekly candlestick patterns are more significant than those on 5-minute or 15-minute charts. Intraday patterns generate more noise and false signals.
Wait for confirmation. Single-candle patterns especially benefit from confirmation on the following candle. A hammer is strongest when followed by a bullish candle the next session.
Volume amplifies signals. A bullish engulfing pattern with 3x average volume is far more reliable than one on below-average volume. Volume shows conviction behind the pattern.
FAQ
Which candlestick pattern is the most reliable?
The bullish and bearish engulfing patterns and the morning and evening star patterns are generally considered the most reliable. Multi-candle patterns tend to be more dependable than single-candle patterns because they provide more data points for confirmation.
Can candlestick patterns predict stock prices?
Candlestick patterns do not predict specific prices — they indicate the probability of a directional move. When combined with other technical tools and proper risk management, they provide a statistical edge. No pattern works 100% of the time.
Do candlestick patterns work for cryptocurrency?
Yes. Candlestick patterns work on any liquid, freely traded asset. The patterns reflect human psychology (greed, fear, indecision), which is universal across markets. They are widely used in crypto, forex, commodities, and equity trading.
How many candlestick patterns should I learn?
Start with the 10 most important patterns: hammer, shooting star, bullish/bearish engulfing, morning/evening star, doji, three white soldiers, three black crows, and harami. Once comfortable with these, expand your knowledge to the full set.
Why do some candlestick patterns fail?
Patterns fail because they represent probabilities, not certainties. Factors that cause failures include insufficient volume, conflicting signals from the broader trend, news events that override technical signals, and the pattern forming at a price level with no technical significance.
Disclaimer
This is educational content, not financial advice. Trading involves risk, and you should consult a qualified financial advisor before making any investment decisions. Past performance does not guarantee future results.
Related Articles
12 chapters covering charts, indicators, risk management & more. Plus weekly trading insights.